
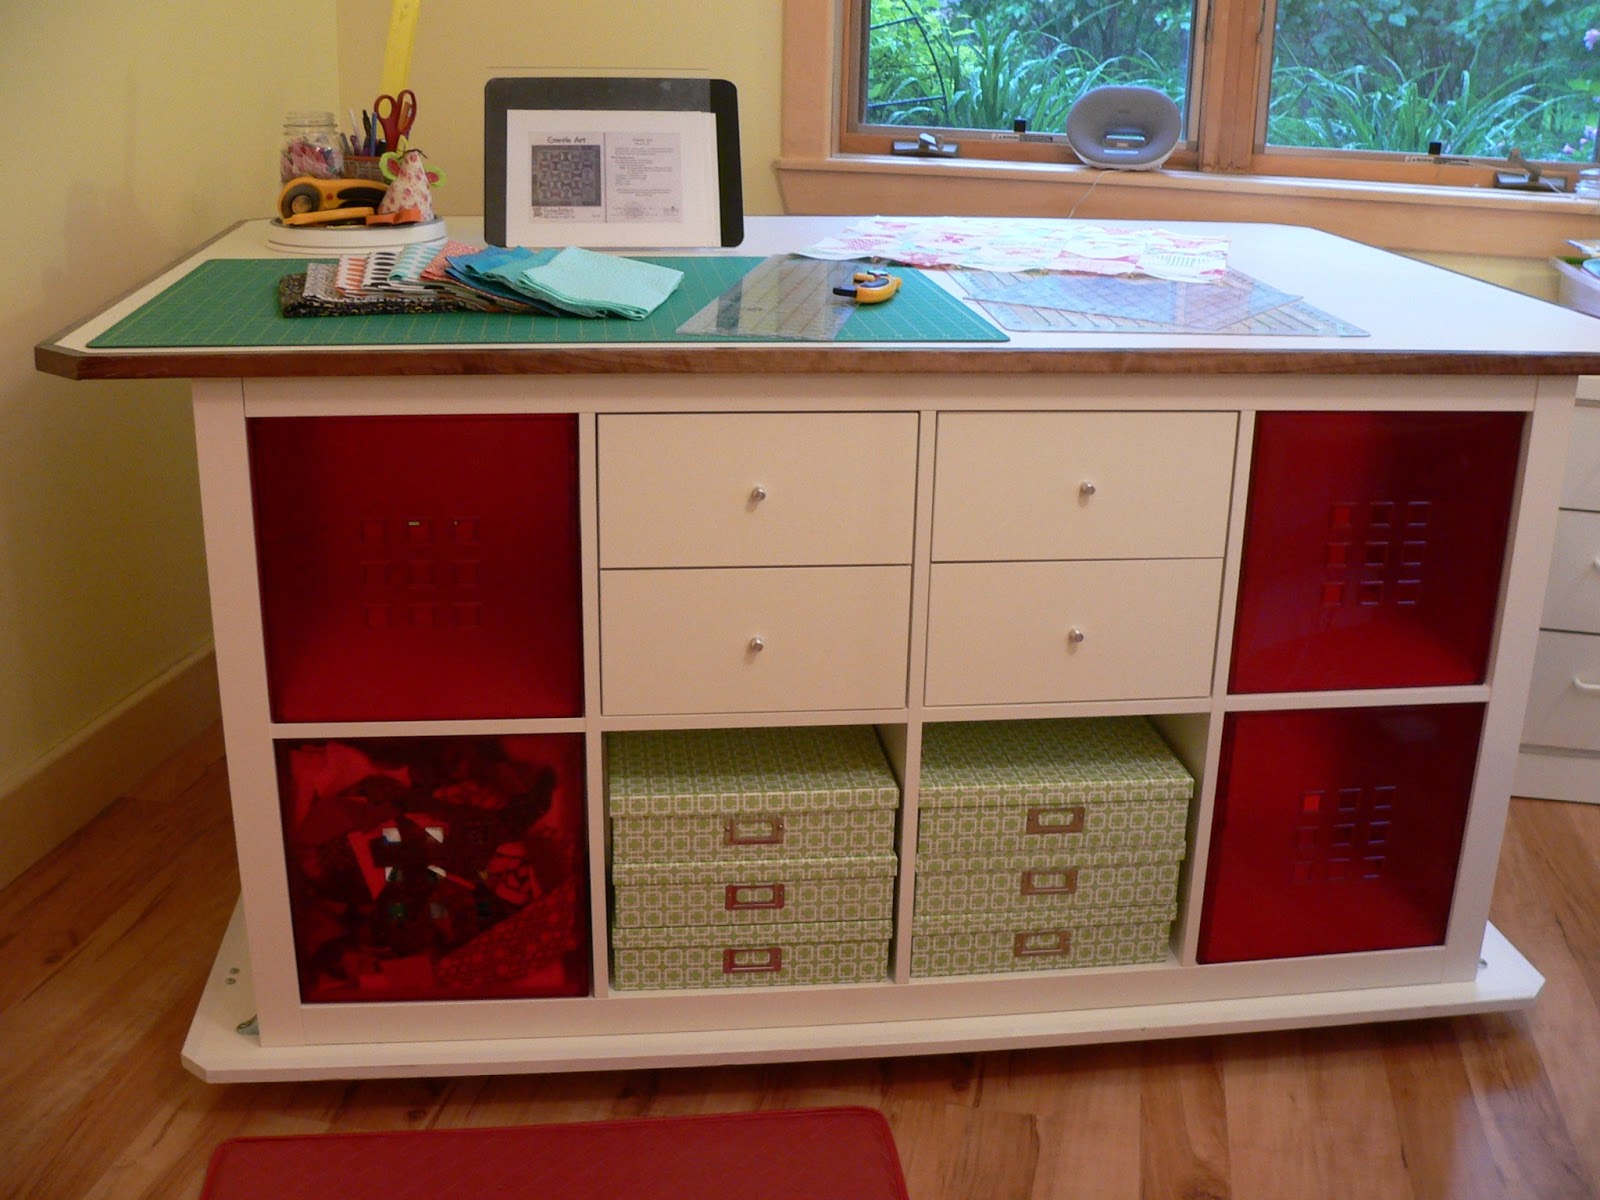
He suggested using melamine instead of plywood for the base and top which was an easy sell - such a durable surface, easy to wipe clean and no painting required. He also added the edge trim so it's nice and smooth and won't snag any fabric. It's on casters so I can move it around - the top is 4' x 6' and the table is 30" (counter height) tall.

I'm going to use the open middle section for batting for starters. So far I have my book collection in magazine holders on the back side occupying 3 cubes and 5 to fill up. I will be moving a few things around in the room today so I can access both sides easily.

The red cubes are 13" x 13" x 13" and were purchased at IKEA. I have one holding scraps from recent projects and 3 empty ones.


But what I really want to do is baste/sandwich some quilts... check out "Come Sail Away" which doesn't even hang over the edge! One of the reasons I wanted the full 4' table width is because most of my Project Linus quilts are 48" by 60" or smaller. Perfect basting surface right? And, since this is my least favorite part of quilting this should make it MUCH less of a chore.
I am going to be adding some storage at the ends of the table once I've decided what I want where. I've got some IKEA towel bars and S hooks for my ruler collection and other tools. I've got a small pegboard unit and some magnetic strips too. My head is spinning with ideas... but those things will have to wait until I've had a chance to "settle in". I'm ready for a week of sewing and putting my dream table to good use!

I'm linking up to Sunday Stash@Finding Fifth and Sew Darn Crafty@Sew Many Ways.
Love it! I printed those instructions for hubby also. I want my ArtBin containers to fit in the holes so we may have to build the cubes ourselves. Love the casters.
ReplyDeleteI'm pinning this! It's exactly what I need!!
ReplyDeleteGorgeous cutting table/storage unit! E njoy filling it up (LOL) Julierose
ReplyDeleteCongrats, it's wonderful.
ReplyDeleteWonderful....I am so jealous! It looks super and such a great storage space....Great job by the handyman! Mine is almost ready to bring up from the shop, if life doesn't get in the way this week!
ReplyDeleteI can't think of any way to make this cutting table/storage unit any better, unless I had one too. Lucky you, and I'm sure you'll make great use of it.
ReplyDeleteCongratulations! That table is fantastic! You will have SO much fun working on it! Wish I had the space! I love Ikea...so many possibilities!
ReplyDeleteThat's quite the fancy sewing table! I love the Kate Spain Fandango orange swirly fabric - used it in one of my first quilts!
ReplyDeleteIt is the perfect size and such wonderful storage areas. The fact that you can position it anywhere in the room is great too. I love my furniture on wheels.
ReplyDeleteI am really jealous. It looks perfect. I'm sure it won't take you long to fill all of the spaces with goodies.
ReplyDeleteOh, I love it!!! I wish you many, many hours of cutting enjoyment.
ReplyDeleteYour table is fantastic! Making me super jealous that we don't have an IDEA here. I love the fact that it's on casters so you can move it around!
ReplyDeleteI am so jealous! One day... I will have a sewing area!
ReplyDeleteHave fun - it looks great
jan@http://sewandsowfarm.blogspot.com/
Wow Deb, your cutting table is superb!
ReplyDeleteWell this is definitely getting pinned ready for that day in the distant, distant future when I have my own sewing room:-)
ReplyDeleteThat cutting table makes you the envy of all of your readers I'm sure. Kuddos to your handyman - he did a great job. Wow!
ReplyDeleteFantastic cutting table...some great ideas here!
ReplyDeleteThis looks just perfect! I am filing this idea away for the future.
ReplyDeleteCongratulations this turned out really AWESOME!
ReplyDeleteFabulous cutting table. I'm a little jealous :)
ReplyDeletewow! awesome place to do some cutting of that lovely fabric you added to your stash.
ReplyDeleteI love your cutting table! If only my sewing room was big enough to take it! :o)
ReplyDeleteYour new table is fantastic. My cutting table has melamine on it and I love the slick surface. I still need to do something with peg board but we aren't yet to renovating the studio so I have time to decide...
ReplyDeleteThe best Sunday Stash addition ever! Deb this is such a practical and neat looking table. So clever to have that middle section between for the batting and larger items. I have pinned your clever DIY work. Well done.
ReplyDeleteDeb, LOVE LOVE LOVE that table!! My husband had offered to make me one for my birthday this past month, and I told him it wasn't necessary. Now that has all changed - just must have been waiting to find the right design! Am sure you are enjoying all the wonderfulness of your studio! Have a blast!
ReplyDeleteWow! That is fabulous! WM studied the pictures and is now thinking!
ReplyDeleteLove this! My husband built one very similar using Kallex from IKEA. I didn't like the knobs that came with it - too tiny - and found quilting related knobs on ETSY.
ReplyDeleteMost of the time I don’t make comments on websites, but I'd like to say that this article really forced me to do so. Really nice post! fastening tools
ReplyDelete