Sunday, June 23, 2013

Dream Cutting Table!

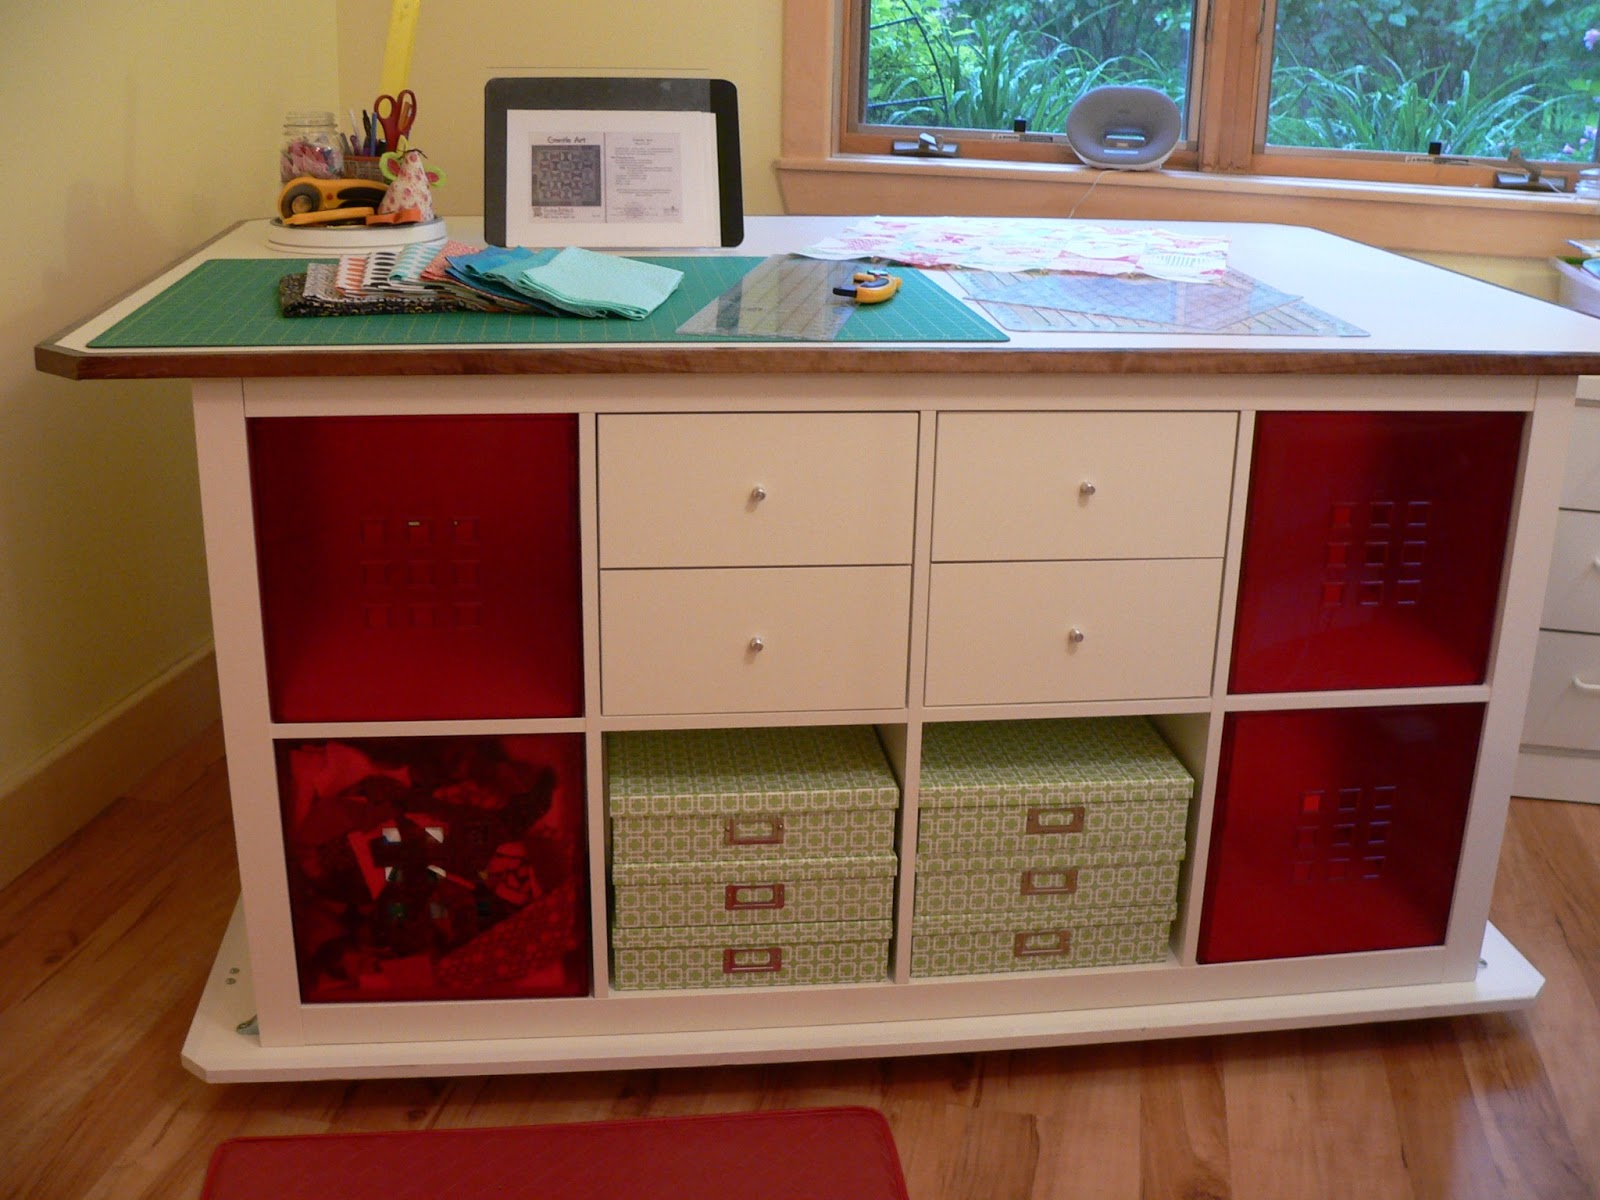
Here it is in REAL LIFE and ready for action!!
My handyman friend brought over the base and the top yesterday morning and it didn't take him long to attach the IKEA Expedit units I'd put together on Friday. We used THIS tutorial from IKEA Hackers as our guide. I had asked him to make the base smaller so I wouldn't trip over the edges and he took it a step further by angling the edges which I love!

He suggested using melamine instead of plywood for the base and top which was an easy sell - such a durable surface, easy to wipe clean and no painting required. He also added the edge trim so it's nice and smooth and won't snag any fabric. It's on casters so I can move it around - the top is 4' x 6' and the table is 30" (counter height) tall.


I'm going to use the open middle section for batting for starters. So far I have my book collection in magazine holders on the back side occupying 3 cubes and 5 to fill up. I will be moving a few things around in the room today so I can access both sides easily.

The red cubes are 13" x 13" x 13" and were purchased at IKEA. I have one holding scraps from recent projects and 3 empty ones.
And four empty drawers also purchased at IKEA. I have several bins to sort through and decide what to put where.

But what I really want to do is baste/sandwich some quilts... check out "Come Sail Away" which doesn't even hang over the edge! One of the reasons I wanted the full 4' table width is because most of my Project Linus quilts are 48" by 60" or smaller. Perfect basting surface right? And, since this is my least favorite part of quilting this should make it MUCH less of a chore.

I am going to be adding some storage at the ends of the table once I've decided what I want where. I've got some IKEA towel bars and S hooks for my ruler collection and other tools. I've got a small pegboard unit and some magnetic strips too. My head is spinning with ideas... but those things will have to wait until I've had a chance to "settle in". I'm ready for a week of sewing and putting my dream table to good use!
A few stash enhancements to round out the post that I haven't shown you yet - I needed some aqua and orange to round out my rainbow stash and found the 5 fabrics on the right side at my LQS. The dotted fabrics came from The Fat Quarter Shop - the large dots on white have a cool ombre effect and the black, grey and yellow are for a future project (I've fallen in love with grey & yellow!).

I'm linking up to Sunday Stash@Finding Fifth and Sew Darn Crafty@Sew Many Ways.

Saturday, June 22, 2013

Crossroads in Yellow

I made 8 yellow Crossroads blocks last week for RSC13. Yellow is a bit of a challenge with value so I tried to mix up the prints in these blocks for additional contrast.
I think they have enough going on to make them interesting.
 I like the yellow and black print very much.
I've also got "Kitchen Sink Strings" laid out for assembly on my floor and I found some light brown fleece in town yesterday to use as backing/batting. This one should get quilted this week.
Later this morning my handyman friend is coming over with the base and top for my cutting table so yesterday I assembled the IKEA Expedit shelving units. I really have to commend their assembly instructions (pictures are so easy to follow!) and their quality control. Both units went together like clockwork without a hitch. I've had my share of issues putting together pieces with misaligned drill holes or missing bolts/screws!
Of course I had to play around with the inserts I bought and other containers I have to see what fits. I have 3 more of the red bins and have 2 of the 2 drawer inserts. I was excited that the green boxes I bought on clearance from Joann's last winter fit so nicely.

This afternoon our daughter and I are going to make a road trip to Home Depot to buy the boards for my design wall and do some other shopping.  She had a long weekend off from work so made a quick trip home.  After she leaves tonight I'll hopefully be doing some more setup/organizing in my quilitng room and have pictures to share tomorrow!

Tucker has a new sleeping spot on my messy shelves in our master closet which looks pretty comfy to me. The first day I heard him before I saw him and had a bit of a surprise!


I'm linking up to ScrapHappy Saturday@soscrappy and Feline Friday@sarah did it!.

Wednesday, June 19, 2013

WIP Wednesday

Looking ahead to the last 10 days of the month I have a LOT of sewing to catch up on! While I bask in the glow of getting my biggest WIP done (my new quilting room) now it's time to get busy inside AND out because I've got to get going on these...
And these....
Those pots don't fill themselves!

So, without further ado:

What's Hot!:
  • Planting annuals
  • UFO #1 Scrappy Summertime - assembling top, sandwiching, quilting
  • UFO #3 Come Sail Away - sandwiching, quilting
  • RSC13 blocks - just about done for Saturday's link-up
  • "Gentle Art" Schnibble - assembling top
What's Next:
  • Everything else on my June Goal List! 

Sunday, June 16, 2013

Sunday Scraps and Stash

I don't know if any fathers read my blog but I wanted to acknowledge the wonderful men in my life... my Dad who has a year of living with a new heart valve and investing in better health behind him and my husband who still makes my heart jump when he walks in the room. I'm blessed!

I've wrapped up this round of sewing string blocks for Heartstrings Quilt Project with 137 9.5" blocks as shown below. You can see more of the UFO set with green centers that I blogged about HERE if you'd like. Adding these to the 60 I made in January gives me 197 blocks toward my goal of 365 for the year (why didn't I just make 3 more for an even 200?).
And the rest of my strings are gone from the messy bin and sorted into lights, darks, warm colors, cool colors and multi-colors.
I'm thinking my next new string adventure will be just warm or cool colors now that I see how pretty they look separated!
I had added some yardage of Marmalade by Bonnie and Camille in May for my still unfinished May Schnibble "Gentle Art" and some extra to make some baskets, thread catchers and other fun stuff for my new quilting room.
Then I came across a sale at Southern Fabric and scored some Vintage Modern yardage and a scrap bag to add to my Bonnie and Camille collection. I've always admired their lines but they didn't suit my decor. Problem solved!
I'm linking up to Scrap Basket Sunday@Kim's Big Quilting Adventure, Building Block Tuesday@Quilter in the Closet and Sunday Stash@Dreaming in Patchwork.

Saturday, June 15, 2013

It's a Wrap!

Come in and take a peek...
I've kind of gotten used to having my sewing tables back to back while I was scraping/painting around them so I think I'll leave them that way for now. When I'm quilting on my Juki 2010q I can use the other table for extra space. Against the back wall is my cutting table where the only overhead light is located.
The only solid wall in the room will be used for design wall space. I'm thinking 2 4' x 8' boards covered in white flannel leaning up against the wall. I like the idea of being able to move them around for taking photos which was suggested by one of my blog readers.
The other corner is storage with leftover furniture from my daughter's room. Look at the sun streaming in that south facing window!


When my big cutting table is assembled I'll rearrange again. The red cube you see on top of the dresser is one of 4 that will fit into the base IKEA Expedit units - I just had to put one together to see how it would look! Here is my prototype picture again from IKEA Hackers.

And of course I've got some things to hang on the wall but I think it will take a while to get up the nerve to pound holes in my pristine walls. I'm also going to be replacing those light fixtures at some point.

Here are my yellow charms laid out to start making blocks for RSC13 - so fitting that June's color matches up to new yellow room. At last, time to sew!
I'm linking up to ScrapHappy Saturday@soscrappy and Freemotion by the River.

Thursday, June 13, 2013

4 Coats Down... 1 To Go!

I think if I had tracked the hours spent from the 1st strip of wallpaper torn off the wall to this point I would either cry or laugh hysterically! Or probably both at the same time...


The color is more accurate in the picture below from the opposite angle taken earlier in the day. I'm really happy with it - a nice soft yellow.
Any yellow paint on the ceiling will be Tucker's fault. As I was cutting in on the ladder this morning he yowled at me non-stop from the window sill until I was done! He feels VERY neglected after umpteen hours of painting evidently.
He says actually he just wanted to me to be VERY careful up there as he recovers from his vigilance in the family room. I imagine he might have a sore throat.

So... 1 coat of drywall fixer/sealer, 2 coats of primer and 1 coat of paint in 3 days. Is it wrong to say that tomorrow I'll be "sewing down the binding" on this project as I put on the final coat of paint? That is if I can still move my painting arm!

Wednesday, June 12, 2013

WIP Wednesday

It's been quite awhile since I've done a WIP post... in May I seemed to get out of synch with so much going on and I'm still trying to get back into a routine of some sort. Hopefully getting my biggest WIP done this week will help me get back on track!

Goodbye to this:
and Hello to this:
My husband and son are spending most of this week with friends from Texas who are staying on a nearby lake. I was over there on Sunday and came back excited for 4 days on my own. Monday I had a wonderfully productive day of sewing, sorting strings and other household projects.

Yesterday I prepped for painting and primed the walls with the Gardz sealer for post wallpaper drywall. As is par for this project, it didn't go quite as planned. The sealer is extremely thin so I ended up brushing it on instead of rolling because it splattered everywhere - which I had read about in advance so that wasn't really a surprise. But I couldn't see the coverage very well straight on because even though it looks milky white in the can it goes on clear. So I did a lot of up/down the ladder and moving around at different angles to spot any dull spots I missed. Very time consuming!

This morning I'll put on a coat of regular primer and should be applying "Sunny Day" by late afternoon. I actually love painting (the prep work not so much) so this is the fun part. I should have pictures for a BIG Friday Finish!

Oh, and the sorting strings project? Looks like this at the moment...
My husband will NEVER see this photo! Our living room is a stringy mess. I've decided to sort my strings and small scraps by color and consolidate several bins into the drawer unit which used to hold UFOs. So this is what I'll be doing in between painting today. My family returns tomorrow night so I've got a deadline.

Did you spy Tucker in that mess?


He is keeping my spot warm! By Friday I should be back to working on these...
Yes, yet another string UFO. This one will be a keeper and I need to make about 40 more 7.5" blocks for a nice sized lap quilt.

Hopefully next week I'll be back in the groove and ready for a "normal" WIP Wednesday post from my beautiful new quilting room. Ooh La La!! I'm linking up to WIP Wednesday@Freshly Pieced.